On New year’s eve a few of my friends came up with a fitness challenge for the month of January. The idea was simple: workout 30 minutes every day 🏋️, , avoid junk food 🍟 and record your weight 📏. . It sounds simple but how do you keep track of all of these small data points to make sure you stay on track? I decided to solve my problem by creating a proof of concept app with React Native and Heroku. I was pleasantly surprised about how easy it could be to build apps using these two technologies that I decided to write this article to help share a blueprint of tools and steps to follow if you want to build your own. I hope this helps encourage the community take the first steps on building an app either for personal use, for a small businesses or just to learn new technologies.
Side note: One of my friends actually created an app for the same new year’s challenge using Glide, check out the link if you would like to explore a more low/no code approach to building apps.
Technical stuff ahead
Although using React Native and Node.JS is fairly simple, you will need some basic understanding of:
- Javascript: Is at the core of most of the technologies used in this blueprint.
- Command line tools: Most of the installation steps require you to run some commands in your terminal
Optional
- Node.JS: Is a Javascript runtime that powers most of the tools we will use. Knowledge of its inner workings is optional but it helps to have it installed beforehand.
- React: Is a popular front-end library that is the basis for React Native. Although not required will help you a great deal to build your React Native app faster.
Finally, remember that this blueprint and not a step by step walkthrough. To fill in the gaps, I will link to the best documentation I know to perform a specific task in more detail, do more research on your own for the topics you are interested on.
OK, I’m still here, where do I start?
I see you want to find out more. To get started, lets look at a few common challenges with building an app:
- How do I build my front end? Do I need to learn a coding language for iOS and Android?
- Where do I store data generated by my app?
- How do I test everything together and publish my app?
The challenges above are pretty hard to tackle with very specialized tools like learning Swift or other languages from scratch. What I have found is that by knowing Javascript and some will to use new frameworks you can tackle the challenge of getting started pretty easily.
In this blueprint I will show you a few set of tools that I used in hopes that you get inspired to start your own project and we will follow these overall steps that will teach you these concepts:
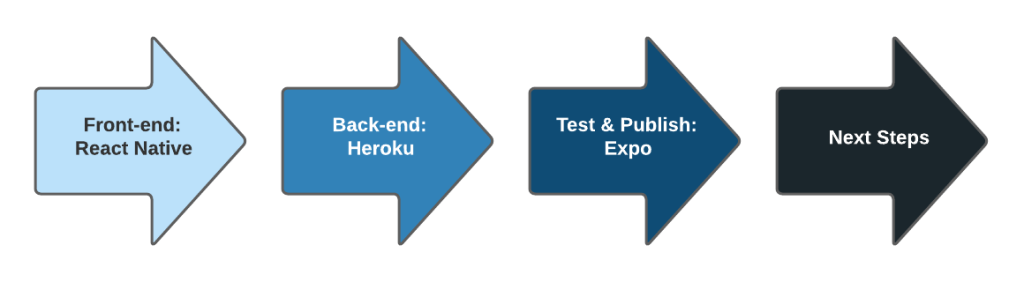
- Build your front-end application using React Native: Will show you how to build modularized modern apps in the React framework.
- Build your backend APIs with Heroku: Will show you how the Plaform as a Service can be a good companion to building powerful APIs.
- Test and Publish your App: Expo will help you build your app for the Apple App Store or Google Play Store.
- Next steps and considerations: Learn to secure your apps and think about scalability.
The front-end: React Native
Arguably most apps out there are pretty simple: You need a way to view some data, edit data and save data to some kind of persistent storage. What if there was a simple front-end framework built in an easy to learn language? This framework must abstract the operating system intricacies of managing screens, navigating through them and persisting data to some kind of storage. React Native to the rescue!

Source: https://reactnative.dev/
React Native is a javascript framework that uses the popular React javascript library to build native apps in iOS, Android and other platforms like your TV 😮 . I decided to use and share my experience with this library because its very easy to get started, there is a great set of documentation and awesome community support. Note that you do need to learn a bit about javascript and how the library works to build more complicated apps, but its fairly easy to get started.
The next few paragraphs will help you build a template app and show you how I structured my app. To follow along, you will need to install Node.js (actually your will need this for all the sections in this blueprint). To install it, follow the official instructions here.
First we need to install Expo using npm, Expo is a set of tools built around React Native that will make it easy to start a development environment to compile and test your app:
$ npm install -g expo-cli
Then we will create an Expo project (a folder to hold your app) and we will start our development server:
$ expo init AwesomeProject

$ cd AwesomeProject
$ npm start
Note: When initializing your project, expo will ask you for a project template. Select “tabs” to have a more structured template to get started.
That easy! Now you will see a new browser window open with a QR code.
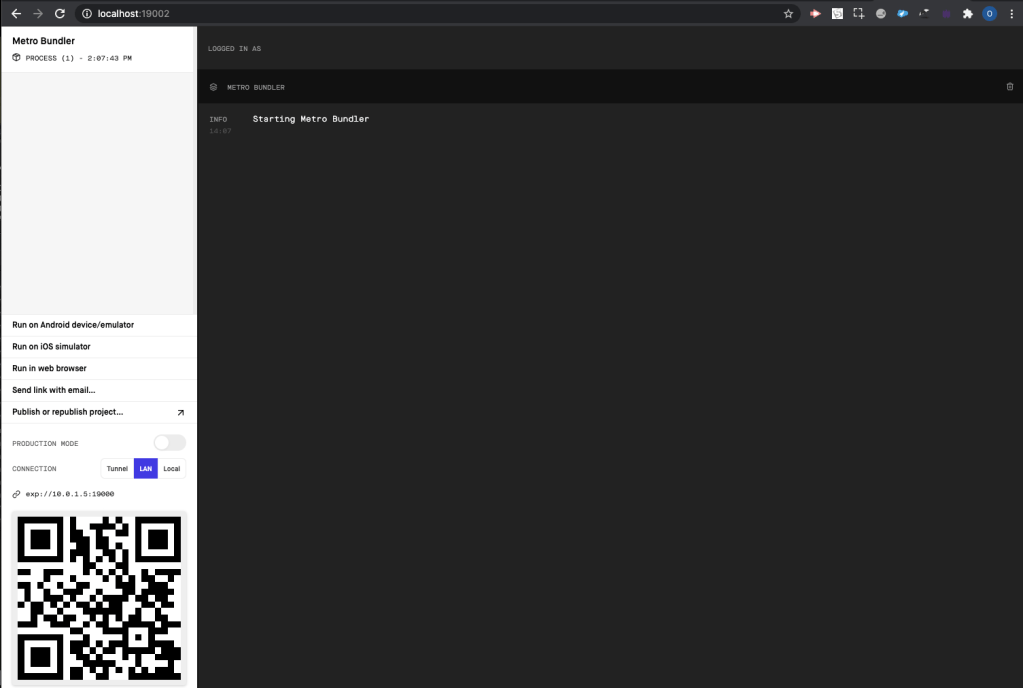
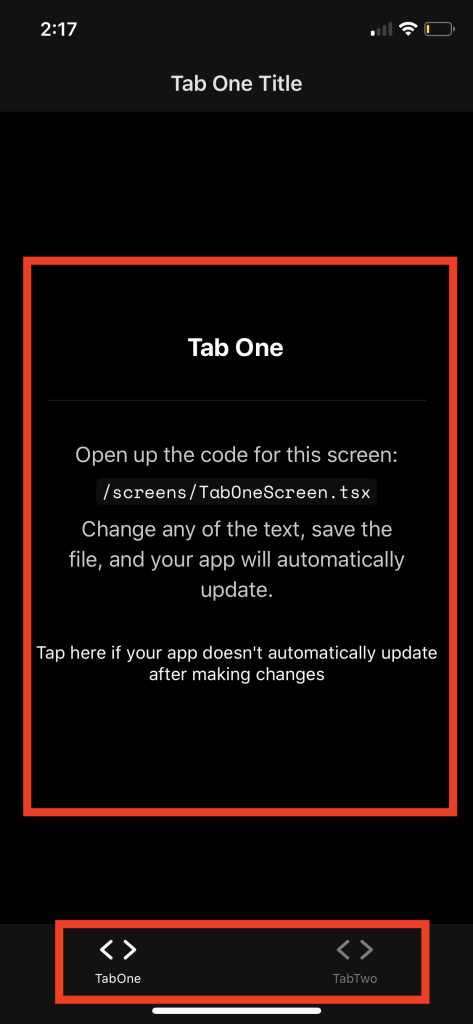
Next you can install the Expo app in your phone, scan the QR code and you will have built your first app!
Now that we have our shell app, let me show you how to structure your app in screens, components and navigation helpers. In the sample project folder you will see a few different folders as shown below:
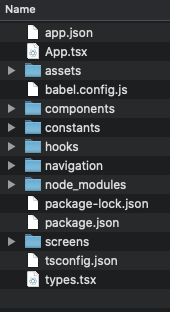
- Screens: This folder will store the main screens of your app, most commonly one per tab.
- Navigation: This folder will store the navigation configuration. For example, the tabs at the bottom of the app. This may seem a bit complicated but there is great documentation in React Navigation.
- Components: React is built on the modularization concept making it easier to build smaller reusable components to use across your app. This folder will store those components.
Take some time to explore these folders and if you are interested, read about more advanced topics regarding the other folders here.
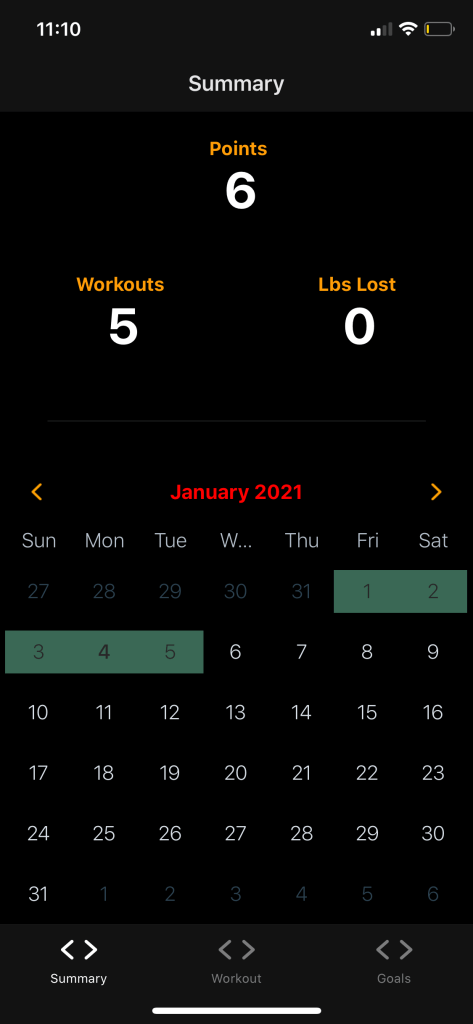
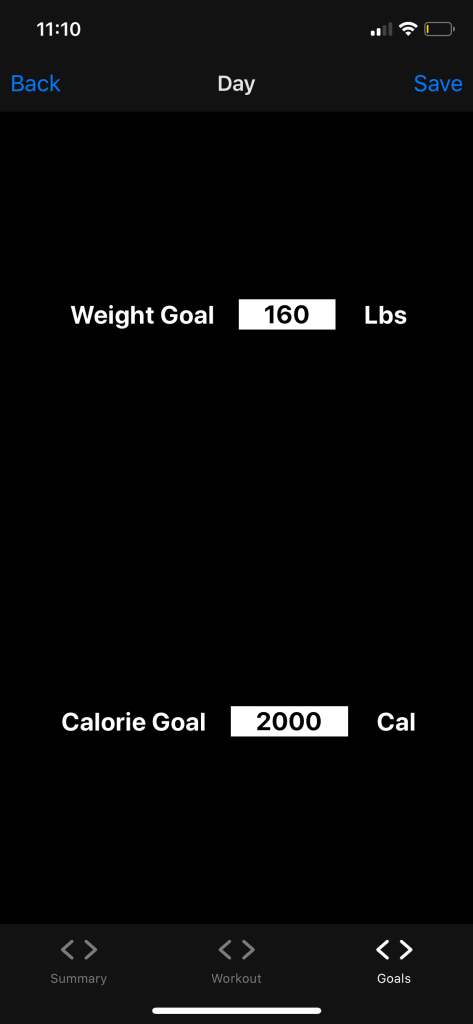
So, how did I build my app? My New Year’s app was pretty straightforward, it has three screens: Summary, Workout and Goals.

In order to make my life easier, I created a few reusable components like:
- Day Selector: To make the calendar reusable and easier to manage.
- Display Metric: You can see above that I display points and other metrics in several screens. To make sure I don’t repeat code I use a component to reuse everywhere and keep consistency.
- Numeric Input: The same thing is true for entering numbers into the app. I use this component in the Workout and Goals screen.
To understand how components work, look at how the Summary screen is composed:

Note: There are some underlying primitive components in the image above that I don’t highlight. The idea is that you create your own custom components for things you will do multiple times in your app, this will make it much easier to manage and develop.
To help you design your app and achieve a modular design start by answering these questions. These will help you structure your project efficiently and achieve maximum component reusability:
- What screens do you want to show your users?
- How will users navigate through screens? Do they link to each other?
- Which screens display data vs which screens accept inputs?
- What pieces of functionality do I use across different screens and can be reused?
- What visual elements will require business logic and can be abstracted in its own component?
The front end is always the more fun part to build of your app, following the first part of this blueprint will help you learn some useful UI technologies and learn the ecosystem that is out there to build apps. To help you learn more about the topics in this section, I link below useful concepts that will be of use when you start your own project:
- React: If you don’t know what React is before reading this article, explore the documentation and tutorials here.
- React Native: Some pre-built components are specific to React Native, check out here what you get out of the box.
- React Navigation: My app was super easy to navigate by only using the tabs. If you are going to link screens and other navigation flows, make sure you understand how React Navigation works.
- React-Redux: As your app starts growing and you have more data inputs or complex data structures, it is useful to use libraries that help you manage your state. Redux is the library I used in the New Year’s resolution app because of its cohesion with React, learn more about Redux here.
- Expo: Expo is the library we used above to build our React Native code in a development server. Learn more about Expo here. We will also use Expo later own to build the final version of our app to publish.
The back end: Node.JS and Heroku
So far we have built most of our front end screens and user inputs. Now the question is where do we want to store this data? Some apps choose to store its data in the built-in Local Storage of your device. This method will persist data for as long as the app is installed in the device but does not encrypt it or make it shareable to other app users. So if your app has any social aspect to it you will need to store that data somewhere else.

A good option to have a quick back end set up is Heroku. Heroku is a container based Platform as a Service that allows you to deploy and manage your applications without the hassle of maintaining servers or worrying about infrastructure. Additionally, Heroku has an extensive add-on library which allows your app to have extra functionality like a database or monitoring features. The best part is that Heroku has a free tier version that will be more than enough to stand up a proof of concept and in my case to power my personal use app.
Now, in order to connect React Native to persisent storage in Heroku we will need to deploy a Node.Js server that will host a few API end points that our app will be able to access. The Node.Js server will also have a connection to a free Add-on that will host persistent storage like PostgreSQL. In summary we are looking at the following:
Getting started with simple API end points with Node.Js is super easy using Express.Js and connecting to PostgreSQL is straightforward with the “PG” plugin. The next section of the document will walk you through building a quick Express.JS server and an example API.
First lets install Express.JS and start a sample project. Express.JS is a library built on top of Node.JS that allows you to build endpoints quickly and efficiently:
$ npm install -g express-generator
$ express --view=pug myapp
Now install the Express.Js dependencies and start the server
$ cd myapp
$ npm install
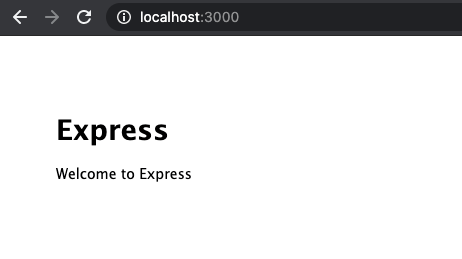
$ npm start
This will start our server and it will be listening on port 3000 by default:
Next you will need to configure your API endpoints. You will need to create your end points and make them interact with your Postgres Database. A great tutorial for this is the Mozilla documentation here.
In the New Year’s resolution app, I only needed to implement two endpoints:
- GET days: Allowed me to get a structure JSON object with all the workout entries and goals for the user
- POST days: Allowed me to post new workout entries and goal updates to the database
In more complex instances you might want to implement a remove workout entry workflow or other end point to retrieve user data. Explore some of the Express.JS tutorials to learn more about coding your end points.
Once you have your API endpoints configured, I recommend that you test everything locally to avoid using your free Heroku monthly hours while you are debugging.
Connect your front-end to your back-end
Now that you have some working endpoints, you will need to call those endpoints from your React Native application. Thankfully, React Native comes with a prebuilt library to fetch data over HTTPS. More details are available in this set of React Documentation.
A quick pro-tip: In the New Year’s resolution app I used Redux and Redux-Thunk to streamline the flow of data from the API endpoints to the application. These are more complicated topics outside of the scope of this blueprint but check them out if you feel ready for the challenge.
In this section we learned to set up API end points and how those can connect to persistent storage. Some concepts to review to take your proof of concept further:
- Express.Js: As mentioned is a good library to set up a quick API end point server. Get familiar with it or explore other options here.
- Redux-Thunk: Learn more about connecting API data to your Redux store using middleware.
- Secure your end points and servers: So far we haven’t reviewed authentication and authorization. I will cover more of what to keep in mind in the last section of this article.
Deploy to Heroku
After you have tested your API its time to push it to Heroku containers 🚀 . For this part of the blueprint, make sure you have created your Heroku account here. Additionally, if you verify your credit card you will get double the amount of monthly free hours.
First let’s create a Heroku App. An App is a collection of one or more containers and add-ons, it allows you to have them logically grouped for monitoring and management purposes:
- In the Heroku Dashboard click “New” > “Create new app”:

- Then navigate to “Resources” > “Configure Add-Ons” to add the free Postgres Add-on:
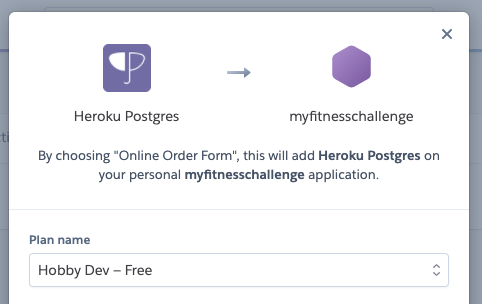
- Once it finishes provisioning, you can click into the add-on to find the connection details:
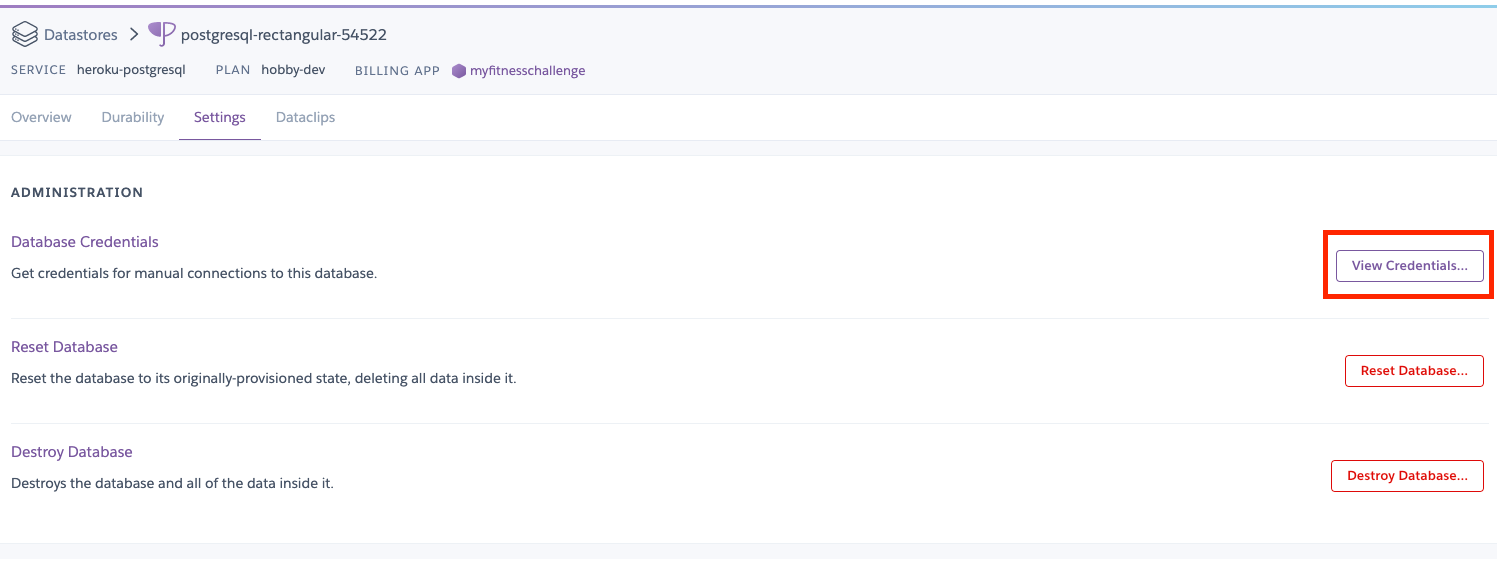
Important: Use the connection URL only when testing locally, when you are deploying to Heroku you can use the Process Environment Variable HEROKU_POSTGRESQL to connect to Postgres. Do not hardcode credentials in your deployed code as they will be stored in plain text and Heroku rotates database credentials in a schedule.
Now its time to deploy your Node.JS code to your free Heroku container. Note that to perform this step you will need to install git and the Heroku CLI. You don’t need a Github account, just git installed in your computer.
- Once you install the Heroku CLI, login to Heroku:
heroku login - In your project folder, initialize git and set the remote branch to Heroku:
cd my-project/
git init
heroku git:remote -a NAMEOFTHEAPPCREATEDABOVE - Now commit your code and push it to Heroku:
git add .
git commit -am "My first commit"
git push heroku master - This will run the build process, after is done run
heroku open
This will open a browser and you are ready to go:
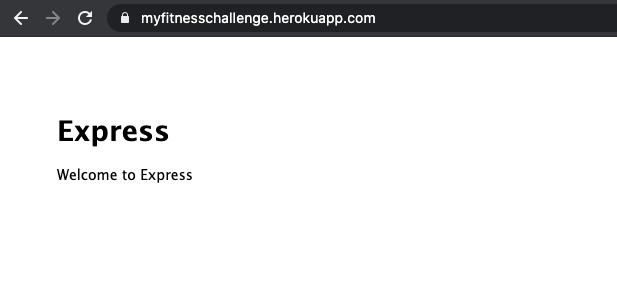
Now you have deployed your first Heroku app to the cloud. Explore the platform and the add-ons offered but alway keep in mind two important things: Cost and Security. Don’t forget that most applications deployed will become public as soon as you deploy them so they must be secure to avoid exposing data from your persistent storage add-ons if its not required.
Publish and Share your App
So now we have a nice proof of concept app and we are ready to share with a few users. React Native and Expo will be your tools of choice to publish your app to the different app stores.
React Native will compile to both Android and iOS platforms pretty seamlessly as long as you didn’t use any of the platform specific out of the box components like the iOS MapViews or others. If that is the case you will need to do some customizations to achieve parity or handle the differences gracefully.
If you are working in iOS it is important to publish to Testflight first so that you can gather feedback before publishing directly to the App store.
In this section I want to leave you with a few references on how to get your app out to the world when the time comes:
- Expo publishing guide: Expo helped you test your apps while coding them, they provide some good tutorials to publish your app.
- Ejecting an app in Expo: If you run into limitations while developing your app because you need process intensive native code operations you can experiment with more under the hood access with the Expo Bare workflow. This is definitely more advanced but check it out here.
Summary, next steps and beyond 🚀!
I hope this blueprint inspired you to get started with your next app idea. In this document I covered at a high level the overall components and order of operations to get started building your app including:
- Build amazing application with React Native. This framework will give you a lot of reusable high level components, javascript compatibility and some code portability into several platforms.
- Your App will need some backend support, use Heroku. Build and deploy back end APIs quickly with Node.JS in the Heroku platform. There is a free plan to test your proof of concepts super fast.
- Publish your apps using Expo: The Expo build engine to compile your apps ready for Testflight or directly to the Google or Apple Stores.
Even though a lot of topics and technologies were covered, this blueprint only mentions high-level concepts, best practices and design ideas. You will need to do some research on your own to arrive to your best final product, hopefully you will find the links that I recommend useful to dig deeper into the content.
To keep the blueprint concise I did skip some steps that could be important if your app will be published to a real production environment to external users. I want to cover these in the last few paragraphs so you can do research if that is where you want to take your app:
- User Authentication and Authorization: Depending on the workflow of your app, you will most likely need an app that asks users to login in order to secure data. If that is the case, explore a few libraries that do this in React Native like Firebase Authentication, Auth0 or Magic SDK.
- Secure your app and APIs: Remember to keep your endpoints secure with HTTPS security plus server side validation and authorization. Your data should be secure, don’t allow other agents to call your endpoints to retrieve data from your data stores. Checkout this article to implement SSL in your endpoints.
- Build to scale: In most of the examples in this blueprint I didn’t cover scenarios where you would need more instances of an API server to account for high user loads. Make sure you think about scaling if your app becomes popular but always keeping in mind malicious actors. A good idea to keep them at bay is to use rate limiting, a good library to implement it is express-rate-limit.
I hope this guide inspired you to build great apps and start the year learning new cool technologies 🚀🚀
About me

Article by Stefan Zepeda
Hands-on Technical Architect and Salesforce enthusiast with experience collecting requirements, transforming them into solutions and implementing them efficiently on any tehcnology platform.
